"路由器(DD-WRT)如何脱机下载BT文件" 修訂間的差異
出自 YTYZX有图有真相的百科
| 行 6: | 行 6: | ||
[[File:BuffaloBT3.png]] | [[File:BuffaloBT3.png]] | ||
3.拉动右侧的滚动条到“Secure Shell”选项,将“SSHd”,“SSH TCP Forwarding”,“Password Login”的“Enable”选项全部选择上。 | 3.拉动右侧的滚动条到“Secure Shell”选项,将“SSHd”,“SSH TCP Forwarding”,“Password Login”的“Enable”选项全部选择上。 | ||
| − | 并点击下方 | + | 并点击下方 “Apply Settings ” 保存设置。 |
[[File:BuffaloBT2.png]] | [[File:BuffaloBT2.png]] | ||
4.选择“Services”,然后选择“USB”,将“Core USB Support”,“USB Storage Support”,“Automatic Drive Mount”均设置为“Enable”。 | 4.选择“Services”,然后选择“USB”,将“Core USB Support”,“USB Storage Support”,“Automatic Drive Mount”均设置为“Enable”。 | ||
| − | 第二项“USB Printer Support”可以根据需要设置,本例中设置为“Disable”。 | + | 第二项“USB Printer Support”可以根据需要设置,本例中设置为“Disable” 。点击下方的“Apply Settings”保存设置 。 |
[[File:BuffaloBT4.png]] | [[File:BuffaloBT4.png]] | ||
於 2014年6月28日 (六) 10:03 的修訂
本例中使用的路由器為巴法絡(Buffalo)WZR-HP-G450H-CH(DD-WRT),需保證可以正常連接上網際網路。 需要使用軟體:MiniTool Partition Wizard Home Edition,PuTTY,WinSCP,Notepad++,FileZilla FTP Client.
1.首先在浏览器地址栏输入路由器地址:192.168.1.250(默认为192.168.11.1),进入路由器。

2.点击“Services”,然后在下面选择“Services”(蓝色框内),如下图所示。

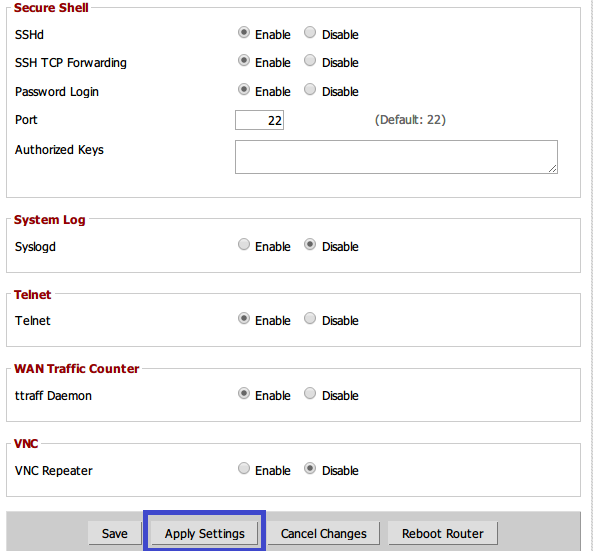
3.拉动右侧的滚动条到“Secure Shell”选项,将“SSHd”,“SSH TCP Forwarding”,“Password Login”的“Enable”选项全部选择上。
  并点击下方“Apply Settings”保存设置。

4.选择“Services”,然后选择“USB”,将“Core USB Support”,“USB Storage Support”,“Automatic Drive Mount”均设置为“Enable”。
  第二项“USB Printer Support”可以根据需要设置,本例中设置为“Disable”。点击下方的“Apply Settings”保存设置。
4.选择“Services”,然后选择“USB”,将“Core USB Support”,“USB Storage Support”,“Automatic Drive Mount”均设置为“Enable”。
第二项“USB Printer Support”可以根据需要设置,本例中设置为“Disable”。点击下方的“Apply Settings”保存设置。

